How to build your Papertrophy papercraft animal
Instructions
1. Know your pieces
All Papertrophy parts have three different kinds of numbers:
Order number
- Use these numbers to sort all pieces before you start building your Papertrophy
- Start building any items that stick out of a Papertrophy and therefore have their own order numbers. (like feet, horns or antlers)
- Take a look at the nomenclatura for each specific Papertrophy model below.
- Always start with No. 1 of each item, for example H1, followed by H2, then H3 and so on…
- After you build the extra items (e.g. Antlers) start with the main part (e.g. head)
- Assemble any extra parts to the main part at a reasonable time so that you can easily reach any pieces and be able to apply pressure from both sides.
Gluing number
- The small numbers around the edges of each piece represent the gluing numbers. You will find each number twice on your Papertrophy. Find the numbers and glue the pieces on top of the associated flaps.
- Take a close look if there might be associated numbers on the same piece of paper. If so, glue them first before attaching the next piece.
Production number
- These numbers can be used to make sure your Papertrophy kit is complete.
- The last number (xx) points out the total number of pieces.
- G1:12/37 means the piece is the 12th out of 37 pieces.
- These numbers do not indicate the gluing order and should only be used to verify that your Papertrophy is complete before you start to assemble it. If you miss one, look behind your desk 😉
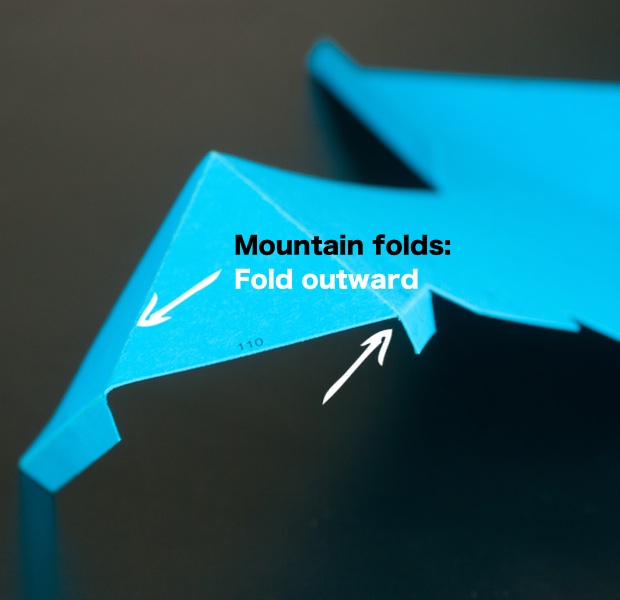
2. Folding
- Dashed/Dotted lines (._._._._.) indicate a “mountain fold”, which means to fold down

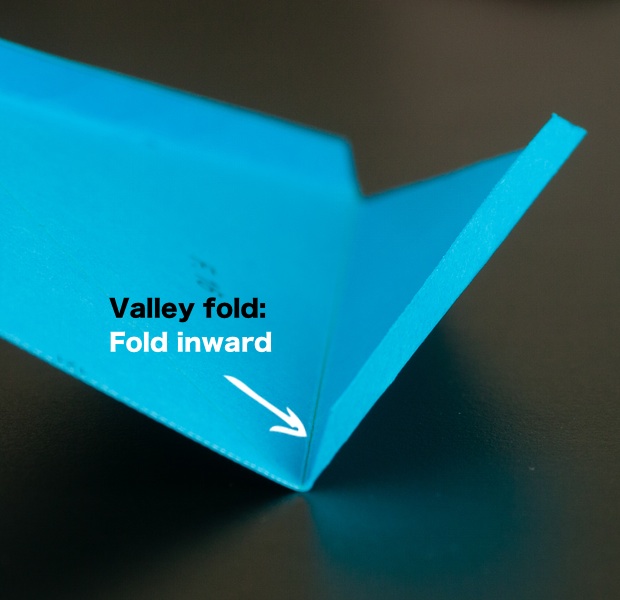
- Dashed lines ( _ _ _ _ ) indicate a “valley fold”, which means to fold up

3. Gluing
- We strongly suggest that you use the Papertrophy special paper glue
- Glue one part at a time
- It is very important that you glue the parts precise to each other. Always make sure the edge of your first piece aligns perfectly on the folding line of the associated flap.
- Press firmly and press everywhere on a flap. Allow short time for the glue to dry
- Don’t apply too much glue. Less is more. The glue will spread out under pressure, so there is no need to glue all the way to the edges as this may result in glue on parts of your papercraft where it is not supposed to be. (the glue should cover the whole flap after pressure is applied)
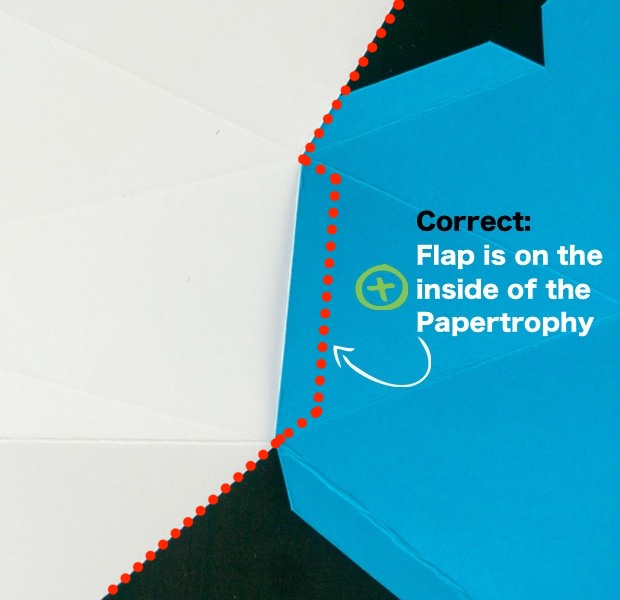
- Make sure that the flaps are on the inside of the Papertrophy. Never glue a flap on top of an associated part.
- If you can’t reach parts from the inside to press them together using a narrow tool like a pencil or a chopstick will help.
- We recommend: https://www.papertrophy.com/shop/glue/


4. Attach your Papertrophy to the wall
- All Papertrophy wall trophies are flat on a back with a hole for wall mounting
- Simply use a nail or a flat hook and place your Papertrophy over it
- For XL Papertrophies we recommend two nails / hooks
- For extra protection in case you touch your Papertrophy by accident you can use some scotch tape around the edges of the wallmouting hole
5. General instructions & tips:
- Make some space: Before you start working, it’s a good idea to make sure your workspace is tidy and clean.
- We strongly suggest to use the Papertrophy special paper glue (sold seperatly)
- Do not use glue-sticks as sometimes you might not reach a flap.
- If you get glue on your hands, make sure to clean your hands right away (have a towel ready)
- Take a break. You don’t have to build your Papertrophy in record time. It’s always better to take your time and glue very accurate.
- If you cant reach a flap for gluing, don’t worry. The beauty of paper is that it’s flexible. Take a look below:

6. Nomenclatura
Lion
- RE: Right eye
- LE: Left Eye
- T: Tooth
- M: Mouth
- F: Face
- H: Head
Deer
- H: Head or F:Face
- LA: Left antler
- RA: Right antler
- RE: Right ear
- LE: Left ear
Penguin
- LA: Left arm
- RA: Right arm
- LF: Left foot
- RF: Right foot
- CH: Chest
- Back
- Tail
- Head
- Hole part & extra part
Gorilla
- R.A.: Right Arm
- L.A.: Left Arm
- L.F.: Left Foot
- R.F.: Right Foot
- H.: Head
- L.S: Left Shoulder
- R.S: Right Shoulder
- belly, last Part & extra part
Rhino
- Big H: Big Horn
- Small H: Small Horn
- H: Head
- Left ear
- Right ear
- Left eye
- Right eye
Elephant
- R.T: Right tooth
- L.T: Left tooth
- R.E: Right ear
- LE: Left ear
- F: Face
- Tr: Trunk
- Mouth
Unicorn
- Hr: Hair
- H: Horn
- F: Face
- LE: Left ear
- RE: Right ear
Pig
- B: Body
- L.F.F: Left font foot
- R.F.F: Right front foot
- L.B.F: Left back foot
- R.B.F: Right back foot
- L.E: Left Ear
- R.E: Right Ear
- Last Part & extra part
TREX
- L.A: Left Arm
- R.A: Right Arm
- M: Mouth
- H: Head
Doberman
- F.L.L: Front left leg
- F.R.L: Front right leg:
- B.L.L: Back left leg
- B.R.L: Back right left
- B: Body
Bull Head
- H: Head
- R: Ring
- L.H: Left Hor
- R.H: Right Horn
Bull
- F.L.L: Front left leg
- F.R.L: Front right leg:
- B.L.L: Back left leg
- B.R.L: Back right left
- B: Body
- T: Tail
- H: Head
- L.H: Left Horn
- R.H: Right Horn
Wolf
- H: Head
Hippo
- M: Mouth
- H: Head
Note: The two last pieces on all standing Papertrophies (Gorilla, Penguin, Pig) should be the “hole part” or „last part“ and the “extra part”. That ensures that you will always be able to reach inside the papercraft animal to apply pressure from within the model. The „last part/hole part“ is the last regular piece of your Papertrophy.
2/3 of the “extra part” will then be glued over the nearby parts to close the papercraft animal. That extra part can be a bit tricky, as applying too much pressure will fold the last part inwards. Make sure not to push too hard, just slightly lay the last part on top of the others applying soft pressure over a longer time. After the glue dried completely repeat it on the edges in case it didn’t glued all the way together in your first attempt.
As an alternative you can glue the extra part to the last flap and fold the remaining parts inside the animal.
Extra note Gorilla:
The belly 1 part connects to the right foot. Belly 2 to the left foot, belly 3 to the right arm and belly 4 to the left arm.
Extra note Lion:
Start building the face first. Attach mouth, eyes and ears and continue with attaching the head-parts one after each other to your lion.
Extra note Elefant:
Start building the teeth and trunk first. Always make sure to start with number one from each part.
A few sets might contain two pieces labeled „Tr.3“. Both pieced has to be glued together.
Extra note Trex:
Start building the arms, followed by the mouth-parts. Then attach the head parts to the mouth piece by piece.
Extra note Hippo:
Start building the mouth part part. Then attach the head parts to the mouth piece by piece.
Extra note XL-Trex:
The new XL Trex has a double backlpate. Please glue the second ontop of the first backplate to strengthen the structure.